Monday, June 24, 2013

What's missing?

See this long planting bed? 

It runs along the side of our yard, for about 75 feet.  Right now it’s looking very barren. 
Until last fall, there used to be five huge pine trees that were each at least 75 feet tall. 

Last summer, one of those tall pine trees behind the house came down and crushed a few sections of our fence. 


Had that pine tree landed just a few inches to the left, it would have demolished the roof over our master bedroom, bathroom and the garage.
I don’t know about you, but I don’t want to wake up to the roof crashing in and a pine tree sticking through the ceiling!  So we called in an arborist who recommended we remove 10 of the pine trees around the house – not every pine tree, but ten that he thought would land on the house if they fell.
As you can see, there are still quite a few trees behind the house:


but that planting bed on the side is nearly empty.  We’re going to rectify that in the next few weeks.
We hired a landscaper who will be adding 2 large maple trees that will have brilliant red foliage in the fall.  He’ll also add a stepping stone pathway and a dry stream bed to catch runoff.  The little Japanese maple (a Mother’s Day gift from 2 years ago) and some of the hostas will have to be moved.  The landscaper will take care of that for us.  After that, any additional plants will be purchased and planted by moi!
I can’t wait to see what it looks like when it’s all done!  In the meantime, the spirea and the roses are blooming!


Friday, June 21, 2013

Adding Sashing to Make Larger Blocks:

For my version of the Blogger Girl’s Block of the Month quilt, I made 13 of the blocks designed by Monique Dillard (I made a 3rd version of the April block).  I also made 12 alternate chain blocks for a total of 25 blocks that I will piece into 5 rows of 5 blocks each.
To get the size quilt I want, I need to add 2 ½” X 12 ½” sashing strips and 2 ½” X 2 ½” cornerstones between each of the blocks and round the perimeter of the central block section.
How do you sew sashing onto your quilt tops?
I always used to sew the sashing in long strips between the rows of blocks but invariable something was off somewhere along the way and I’d end up with a pucker.
Now I prefer to add the sashing directly to each individual block.  Here’s how to do that for a quilt with 25 blocks:

For a 25 block quilt you will need to cut 60 2 ½” X 12 ½” sashing strips in your background or sashing fabric and 36 2 ½” X 2 ½” squares of your cornerstone fabric.
Sew one 2 ½” X 2 ½” square to one end of 35 sashing strips then sew one 2 ½” X 2 ½” square to both ends of 1 sashing strip.
Sew a plain sashing strip (no cornerstone attached) to the top edge of all 25 blocks.  Then sew a sashing strip with a cornerstone attached to the right edge of each block so you end up with a block like this:
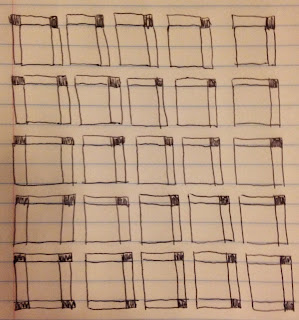
If you have blocks with directional fabrics you need to pay attention to the orientation of your blocks.  If you also planned the layout of your blocks you may want to take a picture of your layout to refer to for this next part.  Remembering that I’m alternating these blocks with chain blocks, my block layout is like this:

Next you will add a sashing strip with a cornerstone attached to the left edge of 4 blocks and to the bottom edge of another 4 blocks, like so:

For the block that will be placed in the lower left corner you will add one sashing strip with a cornerstone attached to the bottom and on the left side you will attach the one sashing strip with a cornerstone on each end:

Here is an example of what a 9 block layout will look like with the sashing strips and cornerstones added:

When you're finished attaching the sashing you end up with larger blocks.  Then it’s just a matter of sewing the blocks into rows.  No long sashing strips to worry about and no puckers!!

Wednesday, June 19, 2013

Don Quixote’s Honey

I am thrilled with my version of the June Schnibbles pattern, Dulcinea!
 

Instead of a pieced outer border I used 3 ½” wide strips of yardage in the multi-colored floral from Honey, Honey by Kate Spain.  I chickened out of mitering the corners of the outer border.  Instead, I was careful to cut the side strips on the length of grain and the top and border strips across the grain so all the flowers would be facing the same direction.
I pieced the backing with some of the leftover layer cake squares.  I still have quite a few left for another project down the road.
One of these days, I’ll actually get around to quilting my Schnibbles projects!

Monday, June 17, 2013

Tilting at Windmills

The center portion of Dulcinea is finished.  The windmill blocks are all joined!  I found I also needed to do that little trick of unsewing a few threads at the juncture of the white triangles when joining the rows.

Next I added the inner border and the cornerstones.  I used Moda Bella solid in 30s Blue for the inner border.  I’ll also be using that blue for the binding.

Friday, June 14, 2013

More Windmills


I really enjoyed making these windmill blocks!  I was hoping to get all the rows sewn together but I just didn’t have enough free time.  


I’ll be taking a departure from the pattern directions again this month and won’t be making a pieced outer border.  I purchased a yard of Bella solid 30’s Blue for the inner border and binding, and another yard of the large Honey, Honey floral with the white background to use as the outer border.  I think I’ll make a pieced backing using several of the leftover layer cake pieces.

Monday, June 10, 2013

Vintage Schnibbles project for June

This month’s Vintage Schnibbles project is Dulcinea.  The central portion of the pattern is comprised of 16 windmill blocks.  I was trying to think up another name for my version and was toying with something with Don Quixote in the title because of the windmills.   Being acquainted with the story of Don Quixote, but never having actually read the book, imagine my surprise when I looked up the definition of Dulcinea and found that it means mistress or sweetheart, as in Dulcinea delToboso, the beloved of Don Quixote!!   That Carrie Nelson is very clever.  Since the line of fabric I’m using to make my version is Honey, Honey by Kate Spain, I’ve decided to name my version Don Quixote’s Honey.  


I generally try to cut all the fabrics I will need to start a project on Friday night.  That way, as soon as I have a chance on the weekend I can get right to sewing.  I put in a full day of sewing on Saturday and completely finished 4 windmill blocks.  

I like the accuracy of starting with larger blocks and cutting them to the correct finished size, but oh, the waste of pretty fabric!!

I’m all set to piece the remaining 12 windmill blocks – these colors are so happy!

Friday, June 7, 2013

Wings Falls Quilt Guild Show - the log cabin quilts...

The Wings Falls Quilt Guild has a log cabin challenge at each show in memory of a former member.  Here are some of the many log cabin quilts at the show:


Wednesday, June 5, 2013

Wings Falls Quilt Guild Show - the applique quilts

My sister, Anne, and I went to the Wings Falls Quilters Guild biennial show last weekend.  We spent three hours ogling all the gorgeous quilts.  I took so many pictures with my phone, my battery went dead.

Take a look at all these beautiful quilts that are primarily appliqued:

This was the best of show


How about the quilting on this table runner? Wow!


This sealife quilt was so cute - each with a yo yo belly.  And look at this tiny quilted crab!  So cute!


I love roosters - the rooster barn is always my first stop at the fair.  The quilter embroidered the types of roosters, and look at the chicken wire quilting!  I love it!


The dimensional applique was gorgeous on this one - look at that lily of the valley
and the pine cone - amazing!


How about these chipmunks?  Aren't they sweet?


Another quilt with dimensional applique - I really like these flowers with the button centers!


And lastly, I fell in love with this little hedgehog!


Monday, June 3, 2013

June BGBOM Blocks

Well the final BGBOM blocks are finished! 

I loved the first star block that emerged, especially the yellow star on the green background:


I also really liked the blocks after this step:


But they really are great all finished:


Here's how I plan to set them, remember I'll be using those alternate blocks in between for 5 rows of 5 blocks:


I'm almost done with the alternate blocks; I just have the outside row of the last seven blocks to complete, then I will also be making sashing strips and sewing on the borders.  I expect to be finished with the top by the July 1 reveal.  

Saturday, June 1, 2013

Flip Flops!


Welcome June!  Here’s a look at one of the new monthly mini quilts I completed last weekend:  Flip Flops.


I’ve wanted to make a flip flop mini quilt for a few years and just haven’t gotten around to it.  I bought this cheery orange print last winter and knew I would use it to make the flip flop mini quilt.  

First I traced a pair of my own flip flops for the outline and noted where the straps were attached to the sole.  Since I have BIG feet, I scanned in my outline and reduced it by 20%.  
The sole of the flip flops were attached with fusible web and then machine appliquéd using a blanket stitch.  The straps are made from grosgrain ribbon.

I hand quilted a wave pattern around all four edges.  Who wouldn’t love to be wearing these flip flops at the beach?  Now if we would just get some sunny warm beach weather, we’ll be all set.