Sunday, March 31, 2013

Happy Easter!

Although this year's Easter mini quilt isn't finished, I do have one that I made in 2011 to show you.

This is my favorite mini quilt I've made so far.  I knew I wanted to represent an Easter basket with a chocolate Easter bunny.

I had a lot of ideas on how to make the basket.  One thought was to weave some twill tape or bias tape for the basket, but then I found this great basket weave fabric:

I also wanted realistic looking Easter grass and I found this fun fur trim in the scrapbook section at AC Moore:

The pink plaid border ties all the colors together. 


Believe it or not, that fabric was $2 a yard from WalMart!  I've used that pretty fabric in several projects and still have some left.

The design is fusible machine appliqued and hand embroidered. 


Each of the design elements is fully backed with fusible web and each of the eggs is a full egg shape.  So that means there are places that are two or three layers thick with fabric and fusible web and it is not easy to hand embroider through multiple layers of fusible web-backed fabric.

For subsequent quilts, I learned to eliminate the parts fo the shapes that don't show on the fornt and to "window" the fusible web (cutting out the middle of t the fusible before fusing to the fabric - saves fusible and makes the quilt softer).

If you celebrate Easter, I hope you have a wonderful holiday with your families.

Saturday, March 30, 2013

Slow progress

I have made slow progress on my new Easter mini quilt.  I finished appliquéing the bias tape wreath and the big pink rabbit. 


I still have to appliqué the bow and flowers.  I actually started to appliqué them but I don’t like my results using traditional needleturn appliqué.  I’d like to try the starch and plastic template method for these pieces. 
I wasn’t able to find any heat-resistant template material locally, so I ordered some from Keepsake Quilting but it hasn’t arrived yet and my Easter mini quilt sits waiting.  At this point, it will not be ready for Easter, but I’ll put it up for the rest of April whenever it is finally done.
I really don't like thimbles - they just feel so clumsy to me.  What works for me are these little round bandaids:


Mini Mystery from Miami is all quilted and bound and it’s hanging in the guest bath.  The colors are perfect for that room and really brighten it up.

Thursday, March 28, 2013

Arthritis is a real pain in the neck

I spent last week cutting fabric, cutting more fabric, and cutting even more fabric!!  Last Tuesday was a snow day – we got 10 inches.  I didn’t want to drive an hour each way in the snow, so I stayed home from work.  I was able to get the rest of the Sinta’s Choice fabrics cut out for the Ohio Star blocks.  I haven’t cut the sashing or border fabrics yet.  I’ll wait until I finish the blocks just in case I make any mistakes J.
Last Friday, I was off from work and I got up a few hours before Mr. Urban, so I cut all the fabrics for the sashing blocks for the Blogger Girls Block of the Month.  Saturday, I was up early again and started cutting the sashing fabrics for “Meadow Lark” (my April charm quilt).  Yes, poor Cindy Lou is going to have to wait one more month to get done.  Meadow Lark is based on the pattern “Lateness is Rudeness” from the book Back to Charm School by Country Threads.  I’m using two charm packs of Meadow by Blackbird Designs for Moda, so my version will be larger than the Country Threads quilt.  I am using the same two fabrics for the sashing squares as for the sassing strips, so that is also different than the pattern.   In the afternoon, I got some house cleaning done and the dust bunnies were sent packing.  Even though I was tired and sore, I managed to squeeze in a little sewing time and strip pieced the sashing strips and squares.
Sunday morning I put in another hour cutting the sashing strips – all 288 of them.  Then I started piecing the hourglass blocks for my Ohio Star quilt.  I sewed the 5 ½” squares and cut them into 144 quarter square triangle units

 that then became 72 hourglass units. 

 I couldn’t finish up trimming the blocks down to 4 ½” because my neck and shoulders gave out from all the cutting so I had to call it a day.
It’s been a little over a year since I had surgery to remove the discs and fuse 4 of the vertebrae in my neck.  I saw Dr. H, the surgeon, last week and told him my left arm/hand pain and numbness are all gone (thankfully), but I still have neck and shoulder pain.  I let him know that I used to be able to sew for hours at a stretch but now I can barely manage 1 – 1 ½ hours.  He told me that the pain may be from lingering nerve damage (could be permanent) or that the discs above or below the fusion may be starting to go bad.  Geez.  Both sound terrible to me.  Dr. H told me to only sew for 45 minutes at a time then get up and walk around or do something else.  Really?  So it’s off to physical therapy twice a week for the next 6 weeks to see if that will help the pain.  I think I need occupational therapy so I can learn to do the things I like to do (like sewing) without being in pain, but what do I know?

Monday, March 25, 2013

Not much to show

I know I’ve been absent for a while, but I was finishing little bits of this and starting little bits of that without much exciting to show for my time. 
“Road to Freedom”, my Underground Railroad quilt, is finally, finally, completely finished, but it’s still not hanging in its designated wall space over our stairs (we’ve yet to figure out how to hang it because we need to figure out how to put a ladder up on the stairs).

I also finished quilting and binding “Hot Cross”.  To showcase my charm quilts, Mr. Urban hung a curtain rod close to the ceiling over my cutting table.  Thank you honey!
A few years ago I bought a big 36 X 60 cutting mat from Joann’s and Mr. Urban cut a piece of plywood to that size and screwed it down to an old banquet table.  That banquet table was in sorry shape, but after spray painting the legs and the new plywood top, it looked pretty good.  We put the table legs inside those plastic bed riser things and that brought the whole table up to a proper cutting height.  Nothing beautiful, for sure, but it worked fine as a cutting table and gave me a lot of surface area to cut big pieces of fabric and for squaring up quilts.
When we finished the whole basement this year, I wanted a real piece of furniture to use as my cutting table and bought this nice table from IKEA. 

I believe it supposed to be used as a free-standing kitchen island, but it’s great as a cutting table.  It’s the right height and the drawers and shelves provide lots of extra storage.  Well, it’s only 24 inches dee1p, so the old cutting mat was too big.  Mr. Urban thought we’d need a special rotary cutting tool to cut the mat cleanly (think of some kind of blade for a Dremel tool).  I figured either a linoleum blade or some tin snips might work.  After much debate between us, I finally decided to just give it a try with some rusty old tin snips we had in the tool box.  If I ruined the mat, I figured I could buy a new, smaller one.  Guess what?  The tin snips worked pretty well.  Sure they left the edge a little rough, but nothing that three passes with progressively finer metal files didn’t take care of.  I am very proud of my “new”24 X 60 cutting mat (and don’t forget that I was right and we didn’t need any special tool)!!

So, I don’t have a lot of interesting sewing to show for my time, but I have made some progress nonetheless.
 

Thursday, March 14, 2013

Eyeglass Case

Here is a picture of the eyeglass case that came with my new prescription sunglasses:

It’s huge.  And leopard print.  Anyone that knows me knows I am not an animal print kind of gal.  Nope.  Not me.  Even so, I tried to use this case for a week.  I usually keep my sunglass case in the cup holder in my car when I’m driving.  This one won’t fit.  I also keep my sunglass case in my purse when I’m not driving.  This one won’t fit.  So I tried to put my new sunglasses in a different case from another pair of glasses.  They won’t fit.
So what’s a girl to do?  Why, she should make an eyeglass case herself!  I looked all over the internet for a tutorial and found this one.  But I wanted a flap with a cover, so I added that to the design.  Also, I pieced the front and back and lining pieces instead of using one long strip as shown in the tutorial. Since my sunglasses seem to be very thick when folded, I decided to make my eyeglass case wider. 
First, I measured the folded glasses from every angle.  Then I cut a piece of scrap book card stock to represent the flap, and used a small 7.5 oz soda can to trace a curve for the corners.
I made a sample using muslin and decided I could make the finished case an inch narrower.


I wanted my case to have some padding to protect these nice new glasses, so I added fusible fleece to the outer fabric layer (cut ½” shorter on all sides so the fleece is not in the seam allowance).  Then I quilted the outer fabrics – horizontally on the flap and vertically on the front and back pieces.


I added a magnetic snap to the front fabric and the lining of the flap, assembled the flap, turned it right side out and attached it to the outside back fabric.  From there, I pieced the front and back outside (seam at the bottom), and front and back lining.  After that, I followed the directions from the tutorial, making sure not to sew through the flap!  Because of the flap, my version is not reversible, but my glasses are more secure.
Voila!  A better looking, better fitting, eyeglass case!

Monday, March 11, 2013

Mini Mystery in Miami

I should work on UFOs more often.  It’s a great sense of accomplishment when a project goes from the UFO list to the finished list!
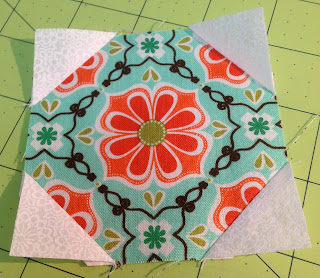
I finished piecing my mini version of the Mystery Quilt in Three Parts from McCall’s Quilting magazine (J/F, M/A, and M/J 2012 issues).  I started with three fat quarters of fabrics I purchased to make a wall hanging for my guest bath.  The focus fabric has orange, brown, and white on a turquoise background.  My accent fabrics are an orange and white polka dot fabric and a turquoise wood grain fabric.  The pattern calls for four fabrics, so I added a fat quarter of white tone-on-tone fabric. 

Several of the McCall’s staff members were participating in the mystery quilt challenge and I was drawn in by the fabrics they chose.  So how do you make a quilt that is supposed to measure 72” X 72” with only four fat quarters of fabric?  Well, I could have made a quarter of the quilt, using full-sized pattern pieces, or I could reduce the pattern pieces so I could make the entire quilt.  I decided to reduce the pattern pieces, not knowing if the amount of fabric I had would be enough to make the full quilt.

Because this was a mystery quilt, only a portion of the instructions was revealed each month.  Not having all the cutting directions in the first month turned out to be a slight problem.  If I ever decide to resize a mystery quilt in the future, I would want all the cutting directions up front.  In any case, I dove in, cut the fabrics for the first month, and followed the piecing instructions.  I decided to reduce the block sizes to 1/3 the original size.  So if a square was supposed to be 6 ½ inches, I cut it 2 ½ inches.  I have gotten used to instructions calling for oversized pieces that are trimmed down to the correct size after piecing.  No trimming down with this pattern, so some of my points aren’t perfect.

The second installment came and I cut the fabrics and pieced the next set of blocks.  Then I had my neck surgery and this project went to the UFO bin while I got sidetracked with other projects.  Last week I cut out the third installment’s fabrics, determined to finally finish this little quilt.  It turns out I had to cut into a second fat quarter of white tone-on-tone fabric.  Even though I had some left of the original fat quarter, I couldn’t get the sizes I needed for the month three blocks, but I think I could have if I had all the cutting directions the first month.

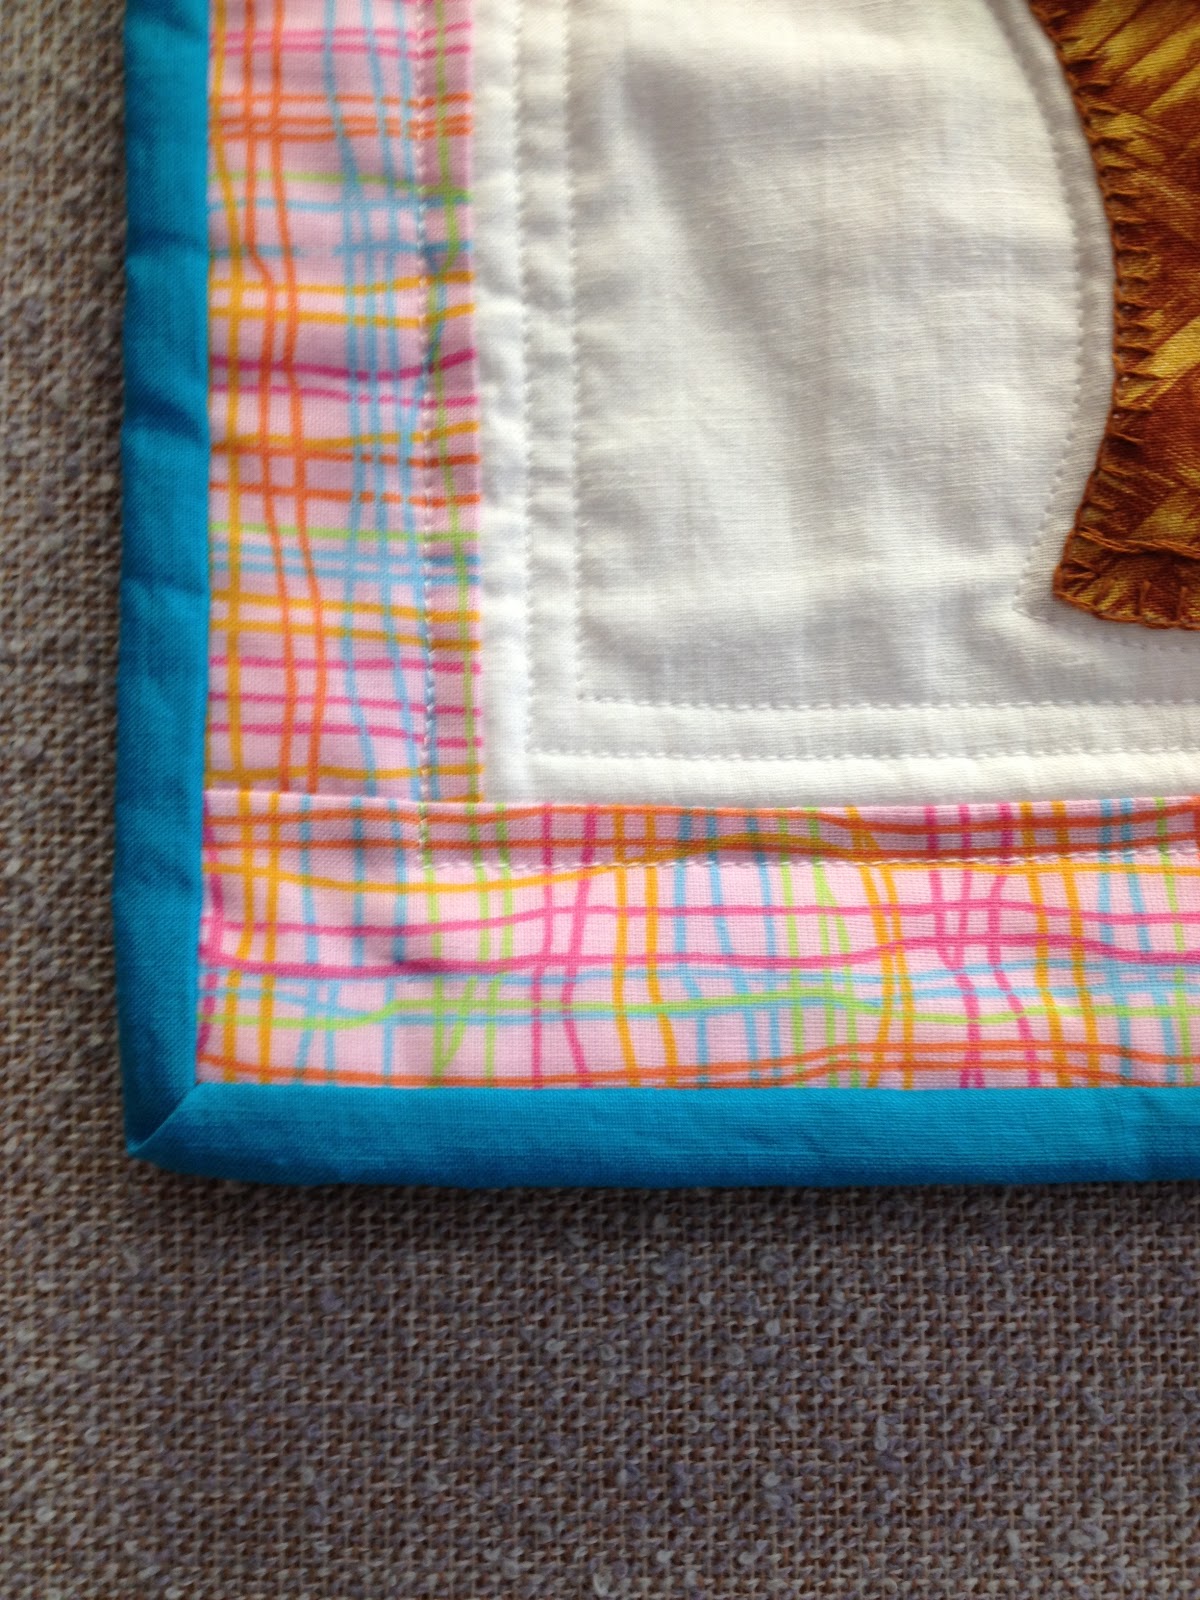
It didn’t take me long to piece the third month’s blocks, assemble the rows and piece the borders – maybe two hours total.  I thought that my finished top would be 1/3 the size of the original, or 24 X 24 (the original throw size was 72 X 72), but it finished at 20 ½ X 20 ½.  I love the way it turned out  Next weekend I will quilt and bind it and be all done with a few weeks left in March to start the April wall hanging . 

I’m calling this quilt “Mini Mystery from Miami”.  What’s the Miami connection?  My brother, Chris, and sister, Kelly, are both big-time Miami Dolphins fans.   While I was working on the quilt this weekend, my sister called and told me about some new sneakers she designed that feature the Dolphin’s colors – turquoise and orange (they will really stand out)! 


(Dolphins logo courtesy of www.sportslogos.net)
I told her I was currently working on a quilt in Miami’s colors – so there’s the connection. Now I will think of the Dolphins and my siblings every time I look at this wall hanging.

Saturday, March 9, 2013

Blogger Girl's Block of the Month - 3


I spent a couple hours repairing those month two BGBOM blocks.  I replaced about half of each block and still had problems with those corner seams. I won't be making another of those blocks anytime soon ( at least not using the same method).

I also spent a couple hours making the month 3 blocks.  I enjoyed putting these together.  It was nice to have something a little simpler to sew.  Who doesn't love strip sets?


Monique's method of constructing the square-in-a-square blocks combined with her rulers made for perfect blocks!


This week's goals:
Finish binding Road to Freedom (the Underground Railroad quilt)
Finish binding Hot Cross
Finish assembling the mini mystery quilt
Make the label for Road to Freedom
Design and work on an Easter mini quilt

Thursday, March 7, 2013

Hot Cross - Nearing the finish line!


I'm nearing the finish line on the Hot Cross Schnibbles quilt.  I finished piecing the remaining cross blocks then rejected the first inner border fabric I chose.  The pattern calls for a quarter yard but doesn't specify fat quarter or regular quarter yard.  I had a fat quarter picked out.  It didn't occur to me that I would need a regular quarter yard and I made the error of not reading the pattern all the way through.  As soon as I saw that length of the inner border strips I knew a fat quarter wouldn't work.  Since most of my stash is fat quarters, I didn't have many choices for a substitute.

The second fabric I chose had some red and brown on cream and I cut the strips and sewed one side on before deciding it was too busy.  The third fabric did the trick.


I assembled all the strip sets for the outer border and made the four hourglass blocks for the corners.  The instructions indicated to cut a total of 100 strips for the borders so i sewed them in sets of 25 strips each.  When I attached them they were each one strip too long!  I left the mess on the design wall overnight and decided to reassess the situation in the morning.  Of course I decided to take the borders apart, remove a strip from each one then reattach them.  After doing that, I noticed that a blue birder strip was lined up with a blue cornerstone from the inner border, so I unsewed some more and replaced the blue strip with a brown strip.


Happy with the results at that point, I marked the top for quilting.  Then It took me about 3 1/2 hours to quilt and another hour to make the binding and sew it to the front.


I also ordered the Thelma Childer's Blogger's Choice fat quarter bundle from the Fat Quarter Shop.  I don't have anything specific in mind for these fabrics yet.

Wednesday, March 6, 2013

Making Adjustments...

I had a very busy week at work and needed to just wind down and vegetate in the evenings, so I didn’t even get any further with hand stitching the binding to the back of the Underground Railroad quilt.  I’m behind schedule.  I did not “finish” a charm pack quilt in February.  Originally I planned to make “Cindy Lou Who” for my March charm pack quilt, but I’ve changed my mind.

Since I still need to finish the February projects and make the Blogger Girl BOM blocks for March, I think I will pull out the turquoise and orange mystery quilt wall hanging I started last spring.  It’s not a charm pack quilt, but it is a small quilt and it is on my list of UFO’s to finish this year.  The pattern for this quilt came in the Jan/Feb, Mar/April, and May/ June 2012 issues of McCalls Quilting magazine.  I’m converting the pattern piece sizes to fit the amount of fabric I have, using fat quarters instead of yardage.  I believe the finished quilt should be 72 x 72 based on the pattern and I think mine will finish at around 24 x 24.

I’ve never attempted to re-size a block before, and I’m not to the point of putting my blocks together for this mini version, but I’ll let you know if my math works out.  I plan to hang this on the wall in our guest bath.  Is that a funny place to hang a quilt?  I have a framed piece of hardanger embroidery in my master bathroom, so it seems like a natural place to hang “artwork” to me.


I finished cutting out the rest of the fabric for the mini mystery quilt.  I had to cut into a second fat quarter of white tone on tone to have enough for the pieces I needed. I'm using the second white on different pieces so it shouldn't look bad.  I think if I had all the cutting instructions the first month I might have been able to use just one fat quarter of white.

When I took the project out of my UFO bin I realized I had completed 2/3 of the project already so there's no reason why I shouldn't be able to get this one finished this month.  I should have time left over to work on another UFO project or start cutting next month's charm square quilt fabrics.

Monday, March 4, 2013

New fabric in the house!


I'm fortunate to have 4 local quilt shops within 15 miles of my house, plus a Joann's Fabrics.  KC Framing and Fabrics is the furthest from my house and not on my usual driving routes.  However the fabrics they carry are more modern and youthful than the other stores locally.  Patti's does have a bright and children's fabric section of mostly Moda lines, but KC has different lines.  The store is run by two sisters and carries Riley Blake and Henry Glass lines as well as fabrics by Amy Butler and Kaffe Fasset.

I was in the area for a doctor's appointment so even though I had pledged to myself that I wouldn't buy any more fabric, I thought I would just stop in and look around (Famous last words).

Of course they didn't have any of the fabrics I am currently looking for (solids /marbles) to go with the Meadow charm pack or border, binding, and backing fabric for the BGBOM quilt).  They did have some very nice polka dot fabrics. I have been collecting polka dot fabrics for a while that I'm thinking of using in a pinwheel quilt.  So I took the opportunity to add 3 more to my stash.


I didn't know I needed any striped fabrics, but I have a few I've purchased and these just looked like they wanted to come home with me.  I have no plans for the stripes, but they might make nice bag linings.


I also received the Paris Flea Market yardage I bought from the Fat Quarter Shop.


Friday, March 1, 2013

March Mini Quilts

I had a hard time deciding whether to use my usual March mini quilt or an Easter mini quilt.  In the end I decided to put up the March ones through Saint Patrick’s Day and then switch over to the Easter quilts.
Both of the March quilts were started in 2011.  “Daffodils” was fusible machine appliquéd.  I started with a single daffodil quilting motif from a free DVD that came with a Quiltmaker magazine.  I traced the design 4 times around the center of the block and reimagined the quilting motif as an appliqué design.

I don’t normally sew with batiks much but the variations in color make for realistic floral appliqué.  I traced the quilting design on template plastic then onto the paper side of the fusible which was already applied to the wrong side of the fabric.  After cutting the shapes out and fusing them onto the background fabric, I machine stitched them in place and added some hand embroidery to the flowers.  I’ve used this cheerful mini quilt for the last two years during March.
Also in 2011, I found the “She Sows Shamrocks” embroidery design offered as a free pattern on the So September blog.  The completed stitchery has been hanging above my sewing table waiting to be finished ever since.  I knew I wanted to finish this embroidery as a mini quilt in the same style as this inspiration piece I saw on the Comfort Stitching blog.  Over the President’s Day weekend, I looked in my scrap baskets and pulled out some greens and yellows that I cut into 2 ½” squares that I made into half square triangle squares that finished at 1 ½” after trimming and sewing. 


I added a one inch white tone-on-tone border to bring the mini quilt up to 14” square.  Isn’t she sweet?